Since I started at the Science and Industry Museum, I have been working on the intriguing sounding project ‘Store 4 Mysteries’. This makes it sound like a Scooby-Doo episode or Famous Five caper. Unfortunately, it’s not so glamorous but it is hugely important. It is helping us understand our collections better so we can use them more or find a more appropriate home for them.
Occasionally, a museum object loses its identity or ends up out of place. A tag that was tied on falls off. A loan that has come off display is never collected by its owner. Part of an object is removed for safety or security reasons but isn’t marked with its unique number. Someone replacing a light fitting puts the old one down on a shelf in a collections store and forgets about it. An object that doesn’t meet the collecting policy is donated anonymously and there’s no way of returning it.
It’s generally a case of human error and is largely a historical problem, dating from the times when curators held much of the knowledge about their collections in their heads and documentation wasn’t considered to be so important. It’s also a massive headache because we can’t display an object that we know nothing about, and they’re no use to researchers.
So let me don my deerstalker and show you some of the ways I solve the mysteries…
Check for clues
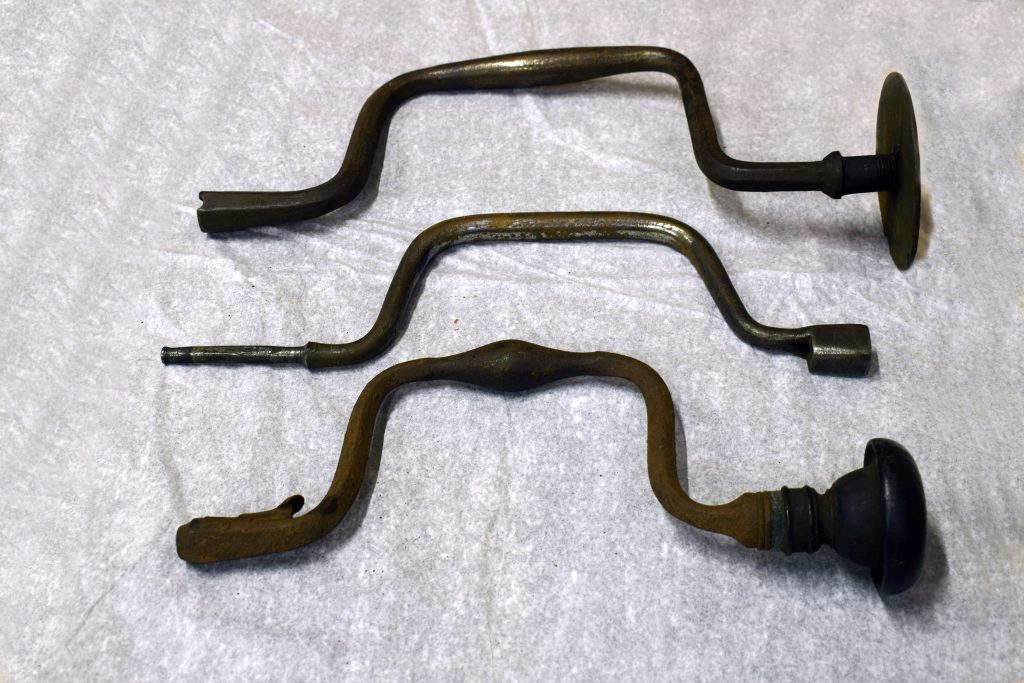
First, it’s important to check the object carefully for clues. Sometimes you can find the object’s ID number hidden in an inconspicuous area, which is a quick and easy win. Unfortunately, it’s not usually so easy. Labels or accompanying notes from donors or past staff can shed light on what an object is, when it arrived, how old it is or who donated it. Identifying marks like patent numbers, registered design numbers, manufacturer’s names and product names on the object can give a huge amount of information or open up new avenues for investigation. The object’s physical characteristics can suggest its use: the material, the shape, the wear, the decoration (or lack of). Trying to pin down how an object works or how it would have been used illuminates what it is.
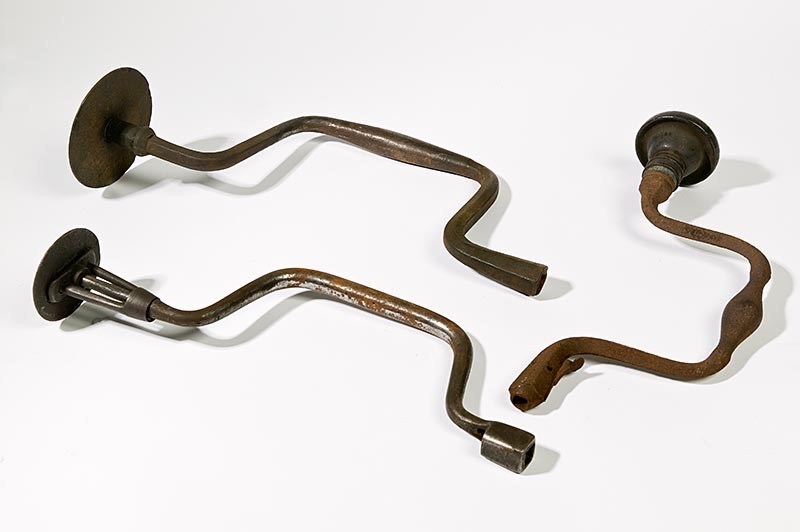
I identified these three brace and bit hand drills by looking at their shape and materials to work out how they might have been used and what for. Once I knew what they were, I could search for matching objects in our database. Success! I matched them with the drills in the photo below.
Decide on keywords and search EVERYWHERE
All of this helps you to define the keywords that you will use to search various sources. In the days before whizzy databases, lots of data was held on spreadsheets. I have spent many an hour keyword-searching inventories of object stores that we’ve long since stopped using. The only saving grace being that they were at least digital (we’ll get to the paper stuff later).
Use your keywords and any leads you’ve found in the spreadsheets to search the database too. The best thing about the database is that lots of the records have photos so you can confirm or rule out potential matches much quicker.
Time to delve into the world of paper
Once you have the reference numbers of some possible matching objects, you must venture into The Strong Room where the paper records are kept. Rifle (carefully) through the acquisition paperwork, hoping to find a nugget of information that clarifies whether this is your mystery object. You mustn’t forget to check the other cabinets of files and papers kept by previous curators. Sometimes you will come across a gem.
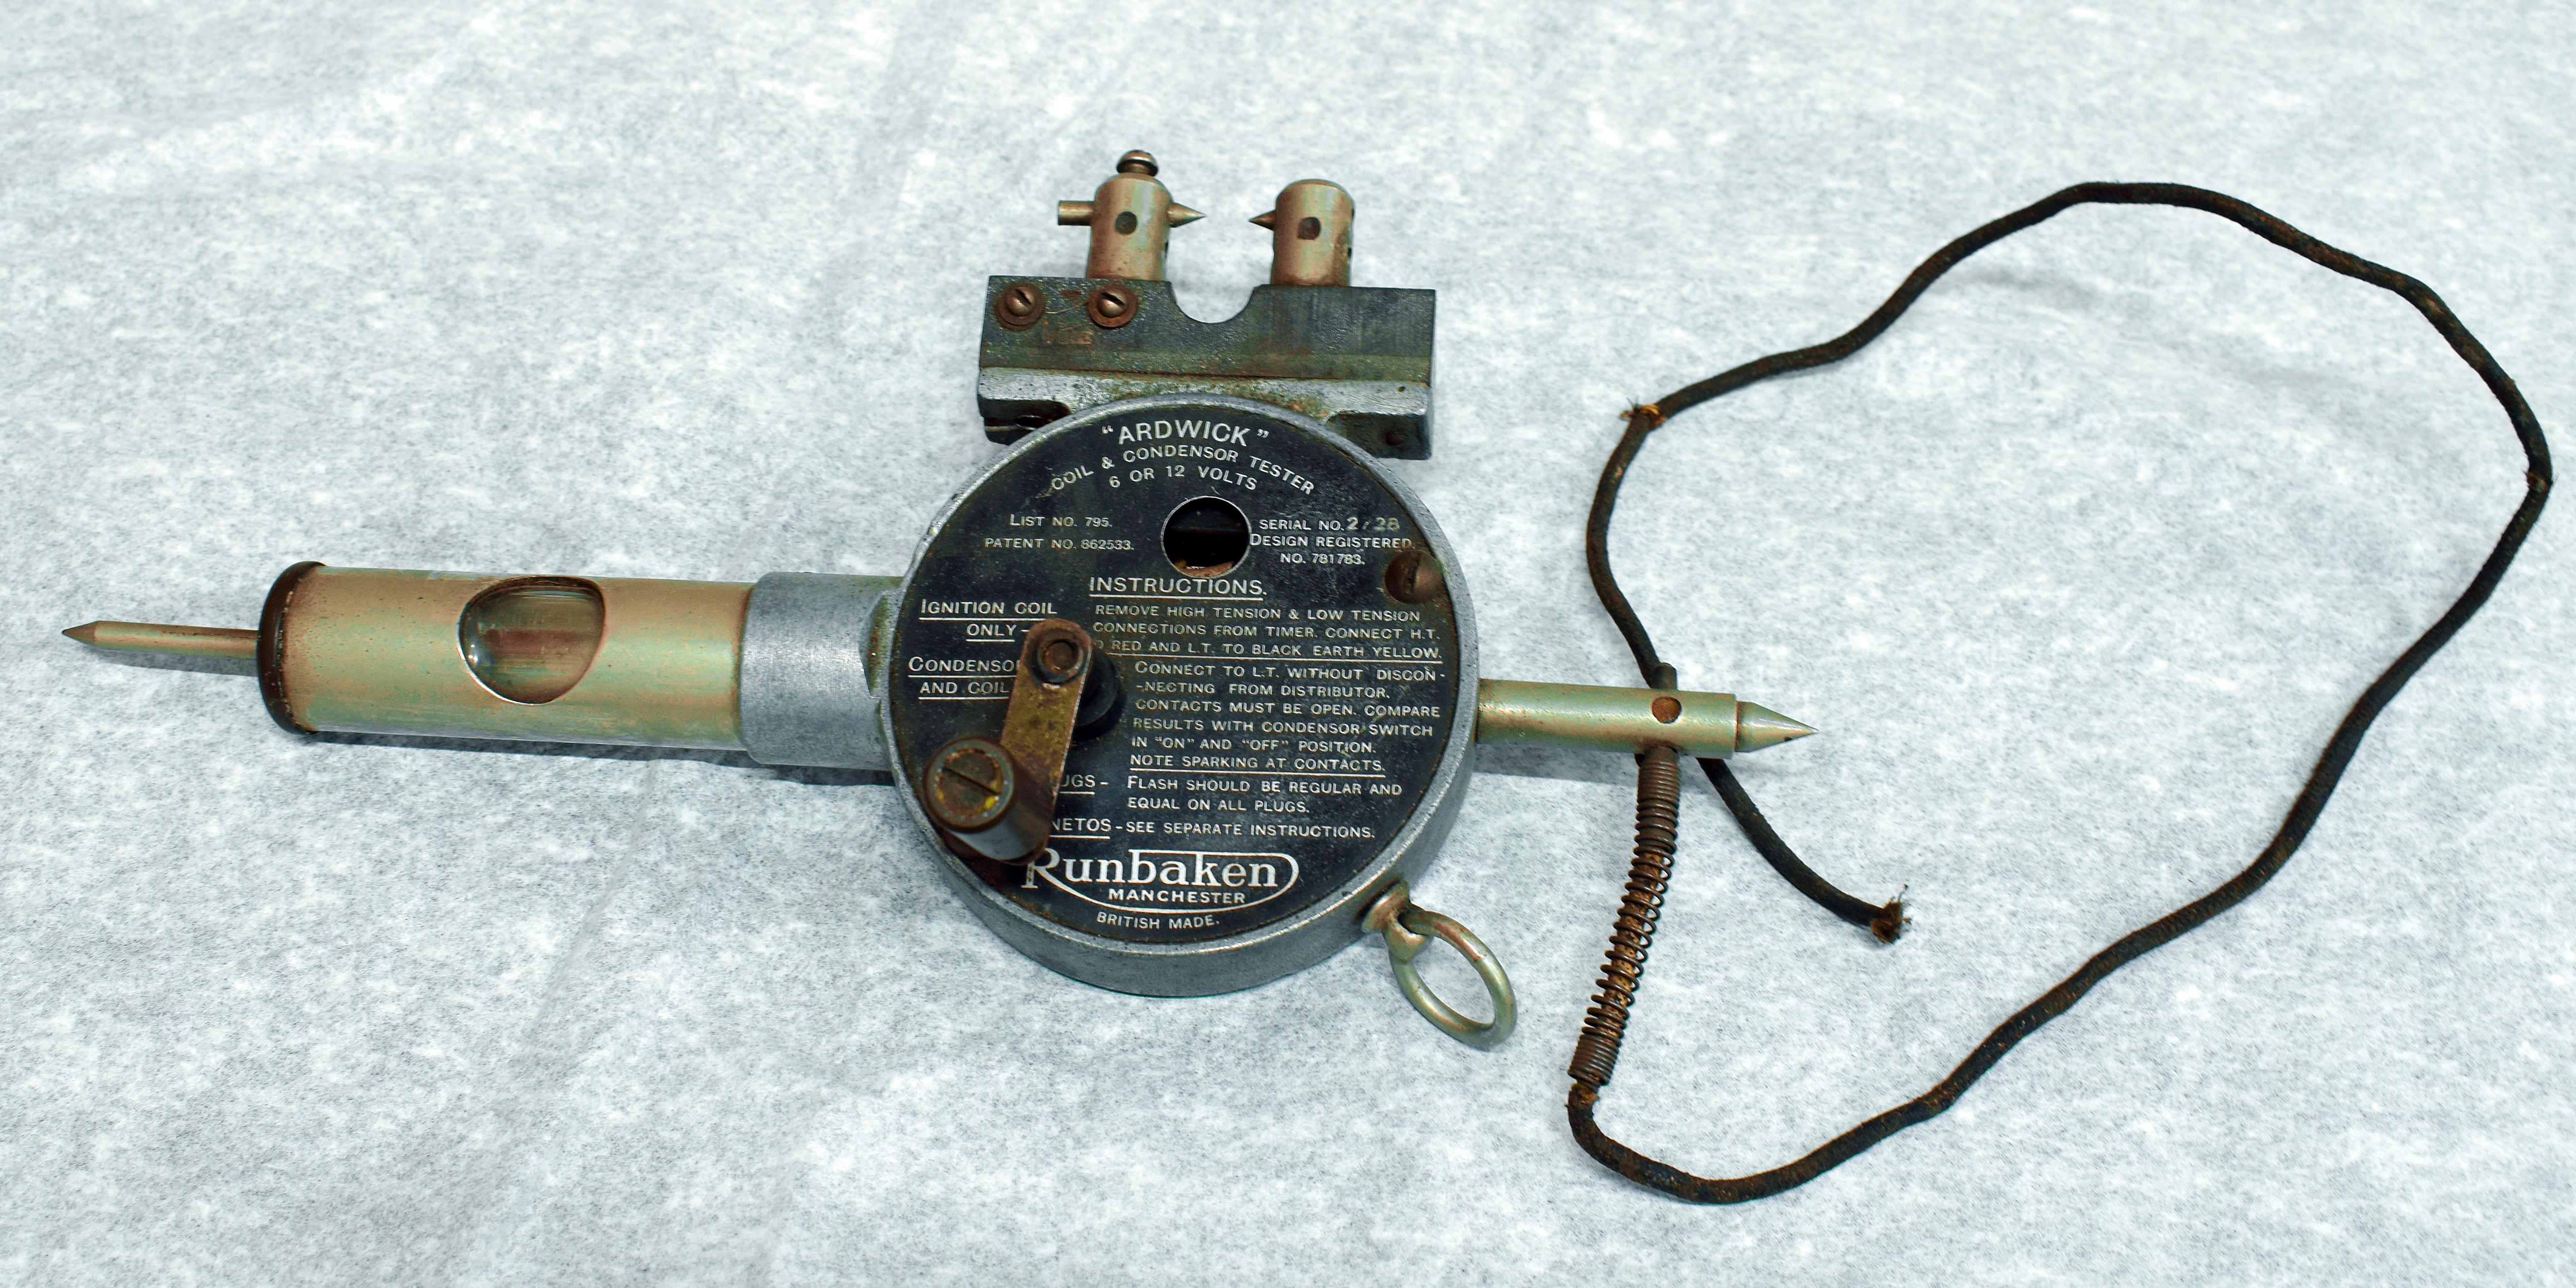
While searching through a folder of old accession forms, I found one that matched this ‘Ardwick’ coil and condenser tester which I was able to positively identify thanks to the great picture drawn by whoever filled out the form.
Ask for help
Occasionally, you can’t work out what something is and that’s when it’s time to ask for help. I’m really lucky because, as part of the Science Museum Group, I can call on colleagues from across the group who have a wide spread of specialisms. And if no one has a specialism in that area then I look for someone who does, either contacting them directly or by sharing through specialist networks like the Social History Curators Group. Even if someone doesn’t know the answer, they can usually point me at a book that might help. The brilliant thing about the museum sector is that it is full of friendly helpful people and the more brains trying to solve the mystery the better.
Google is your friend
So many resources are digitised now that a Google search (other search engines are available) can help identify a mystery object and tell you where and when it was made and what it was used for. Sometimes the route is simple, for example a company website or contemporary trade directory tells you what a company made, but other times the way is more complex… and flukey.
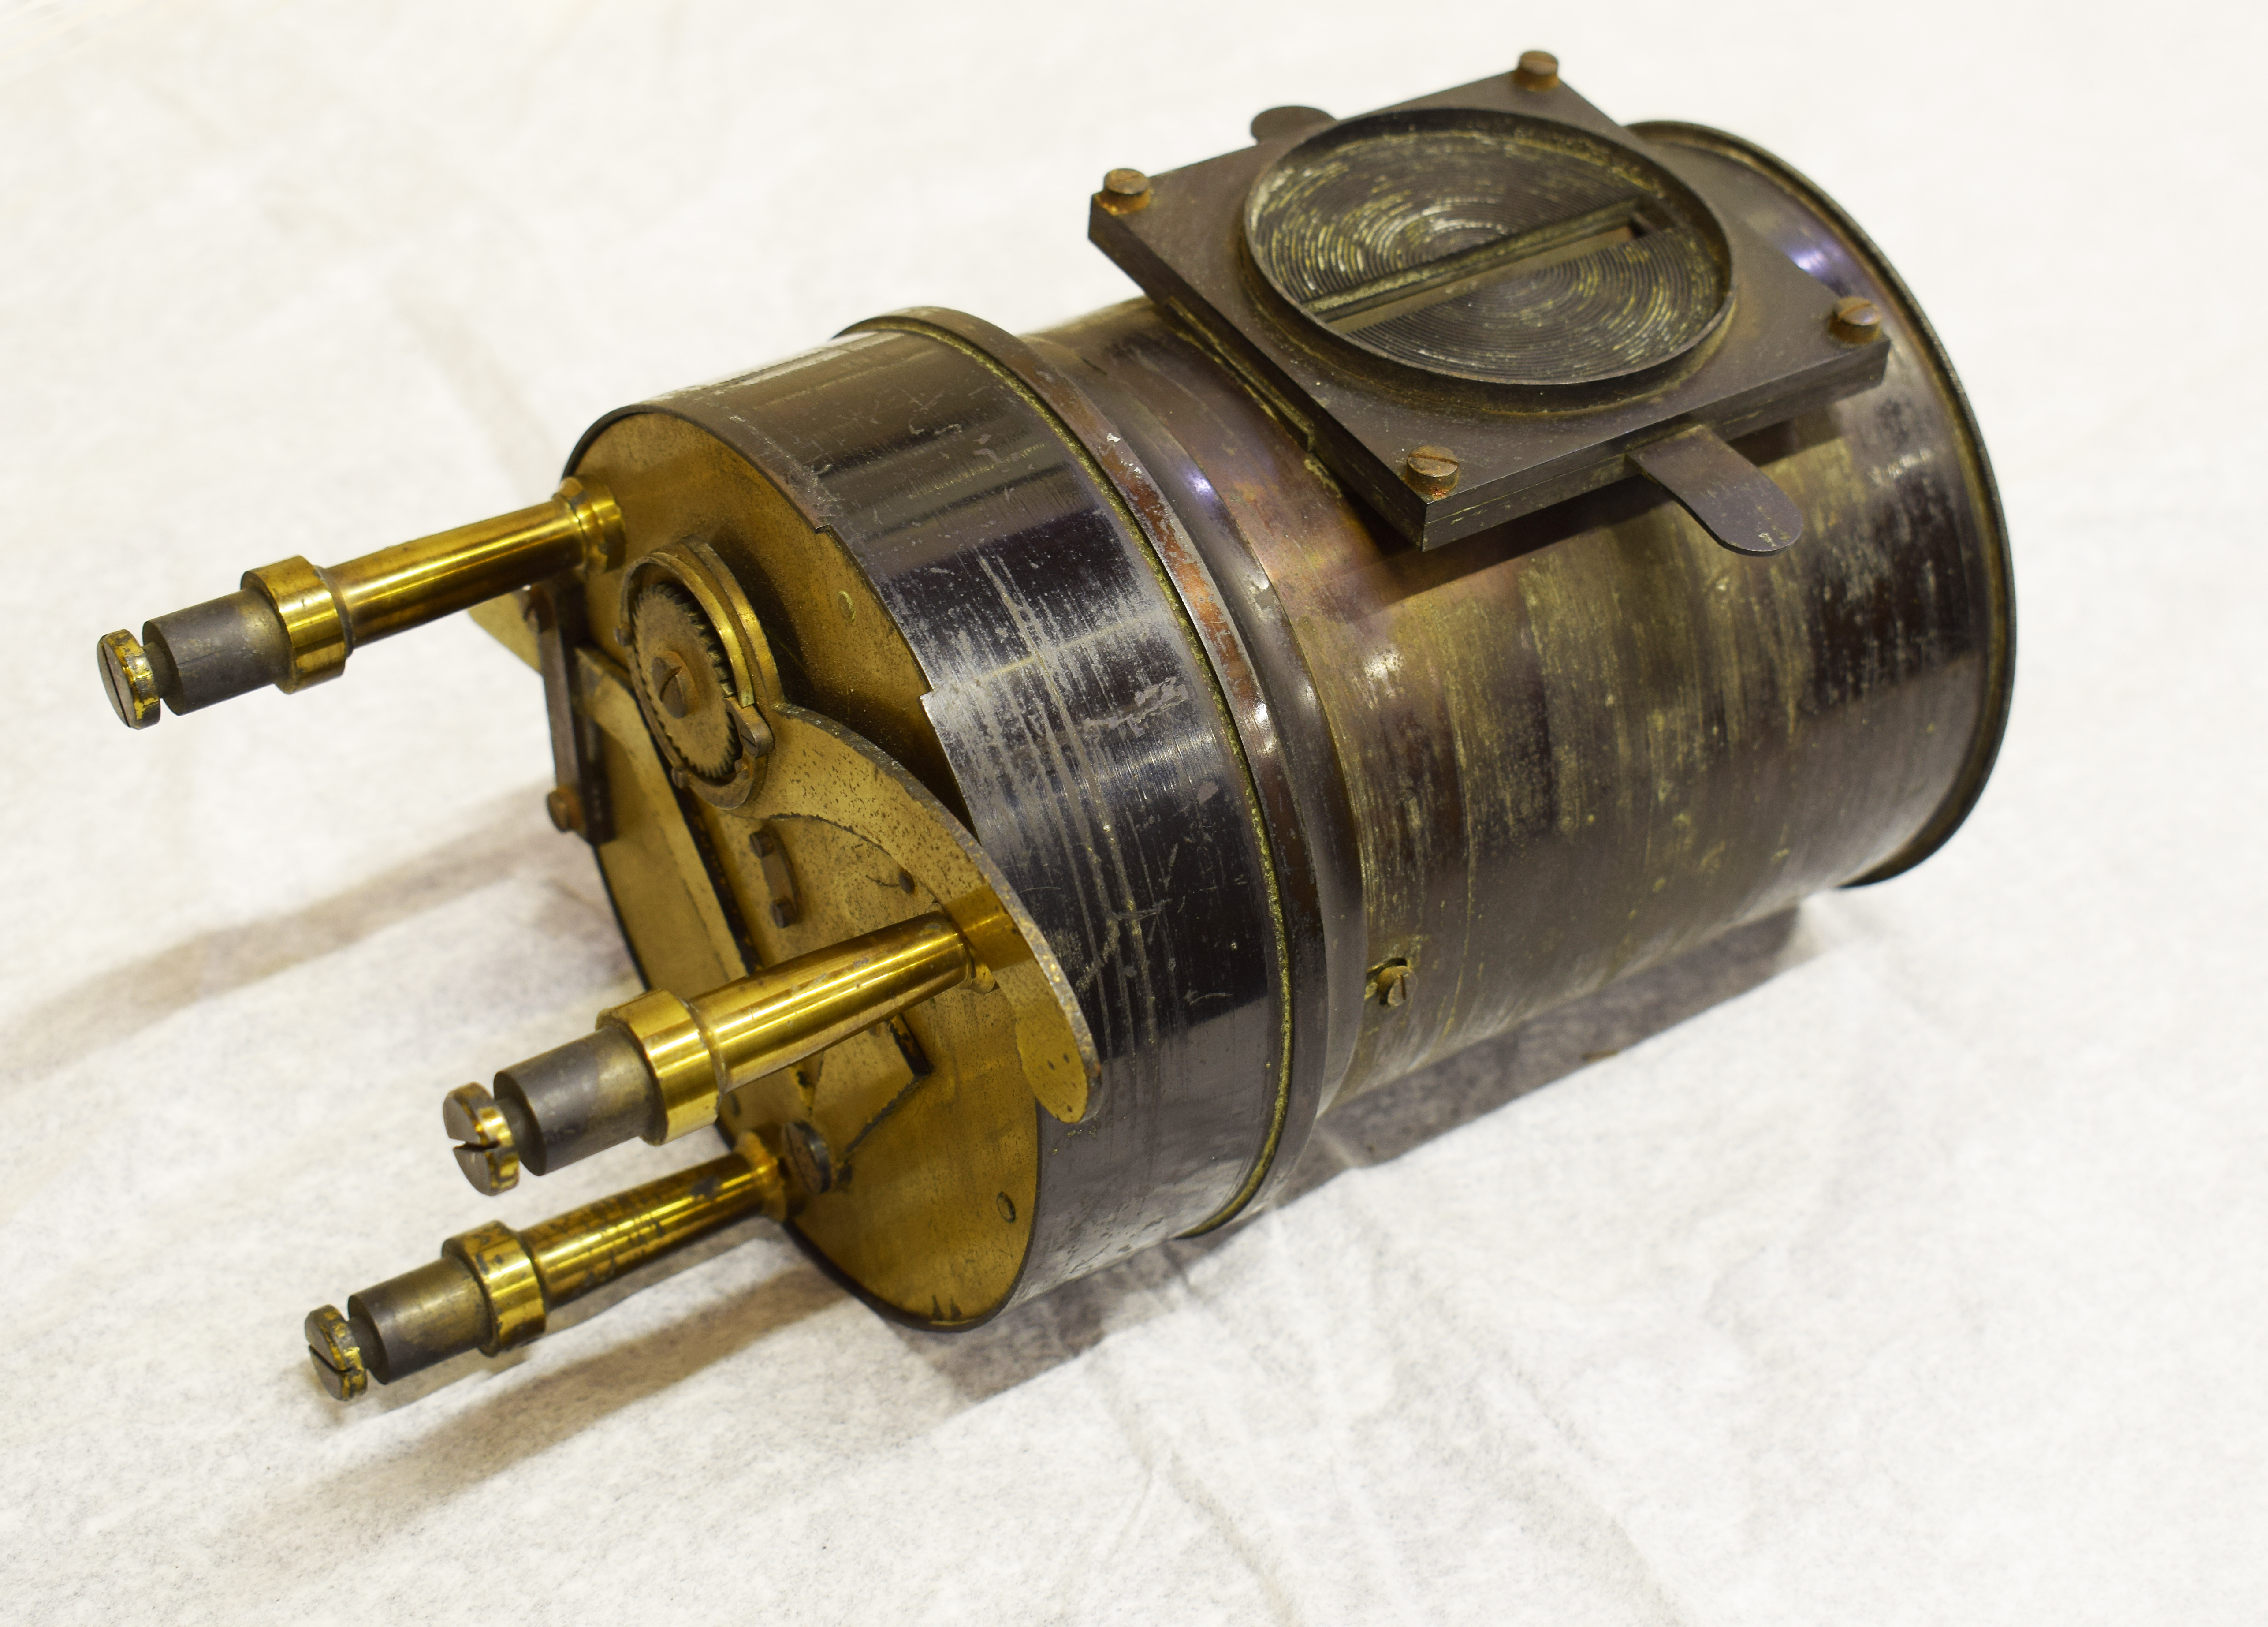
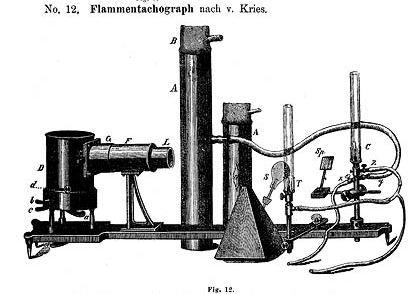
This recording drum was initially identified as belonging to a mirror galvanometer. I was searching the internet for information on the manufacturer when I found a digitised catalogue of their products (thank you Max Planck Institute for the History of Science!) I was skimming it for mentions of galvanometers until I came across this diagram with the very familiar-looking recording drum on the left. After translating the catalogue entry into English, I discovered it was actually part of a flame tachograph, for recording someone’s heartrate using a gas flame.
this is where you come in…
Once in a while, however, there is in an object that just has you stumped. That is when I turn to you, the public, and call upon the hive mind of the internet. Please have a look below to see if you can help identify any of these mystery objects.
Object one
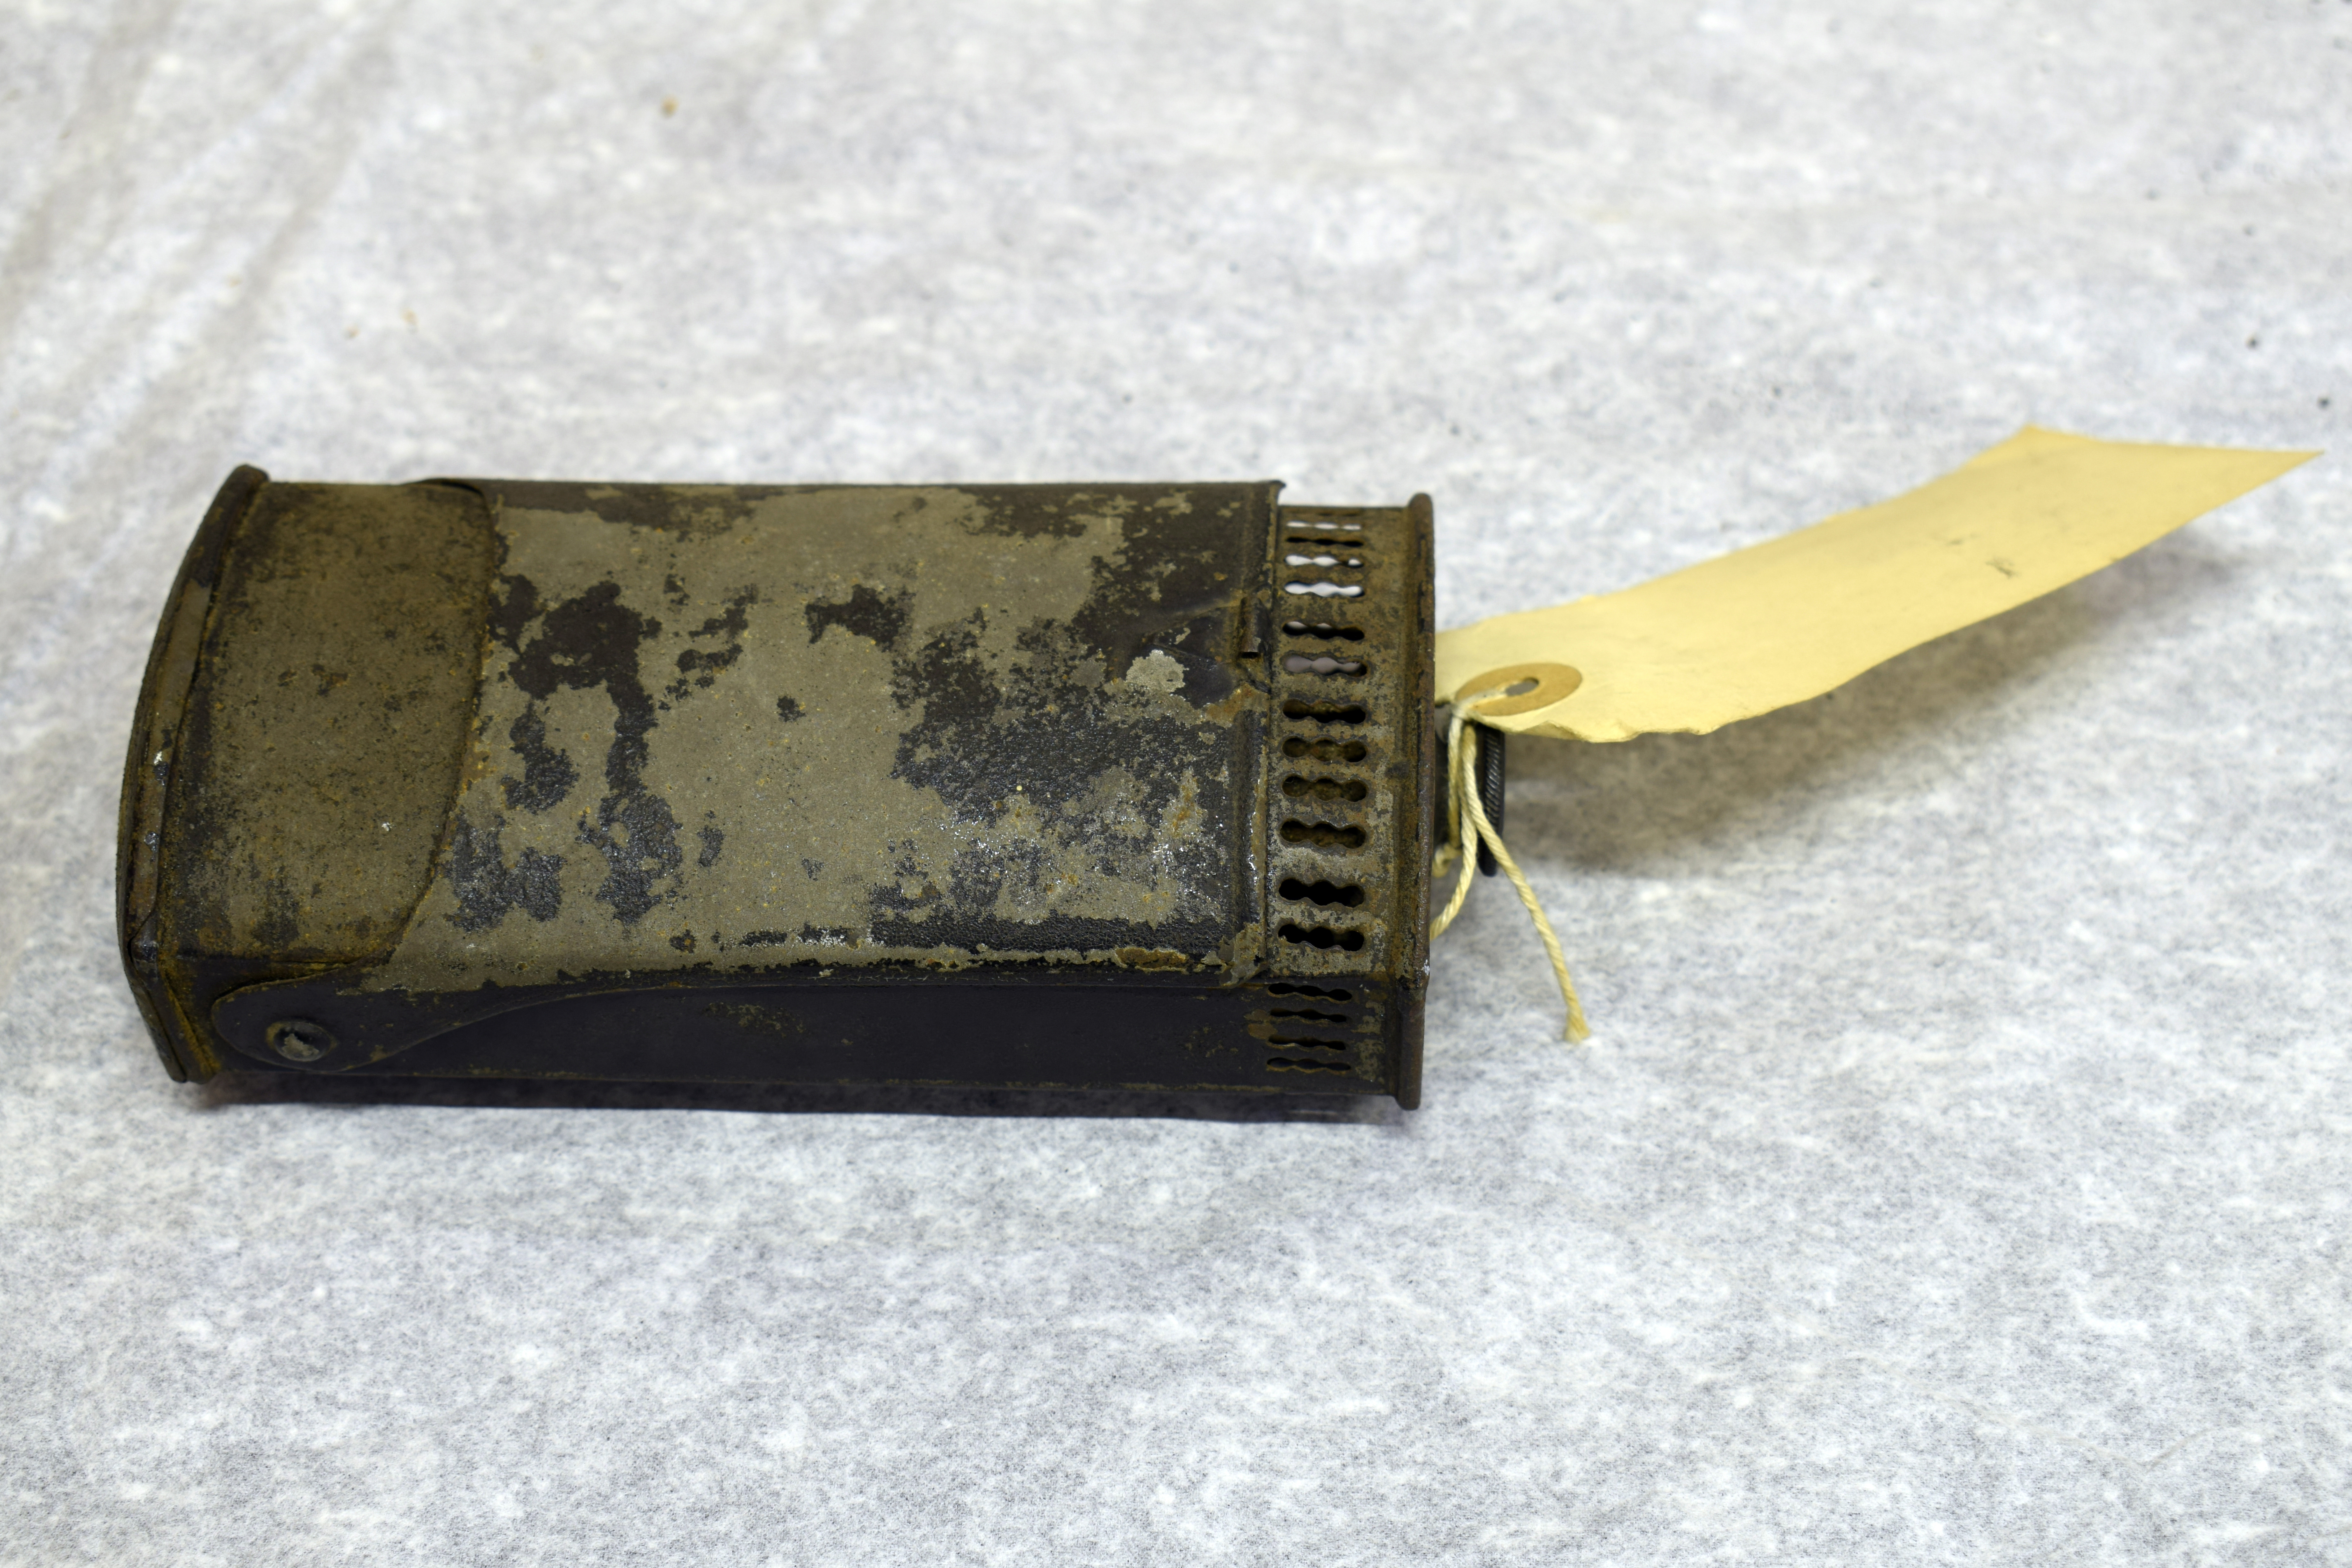
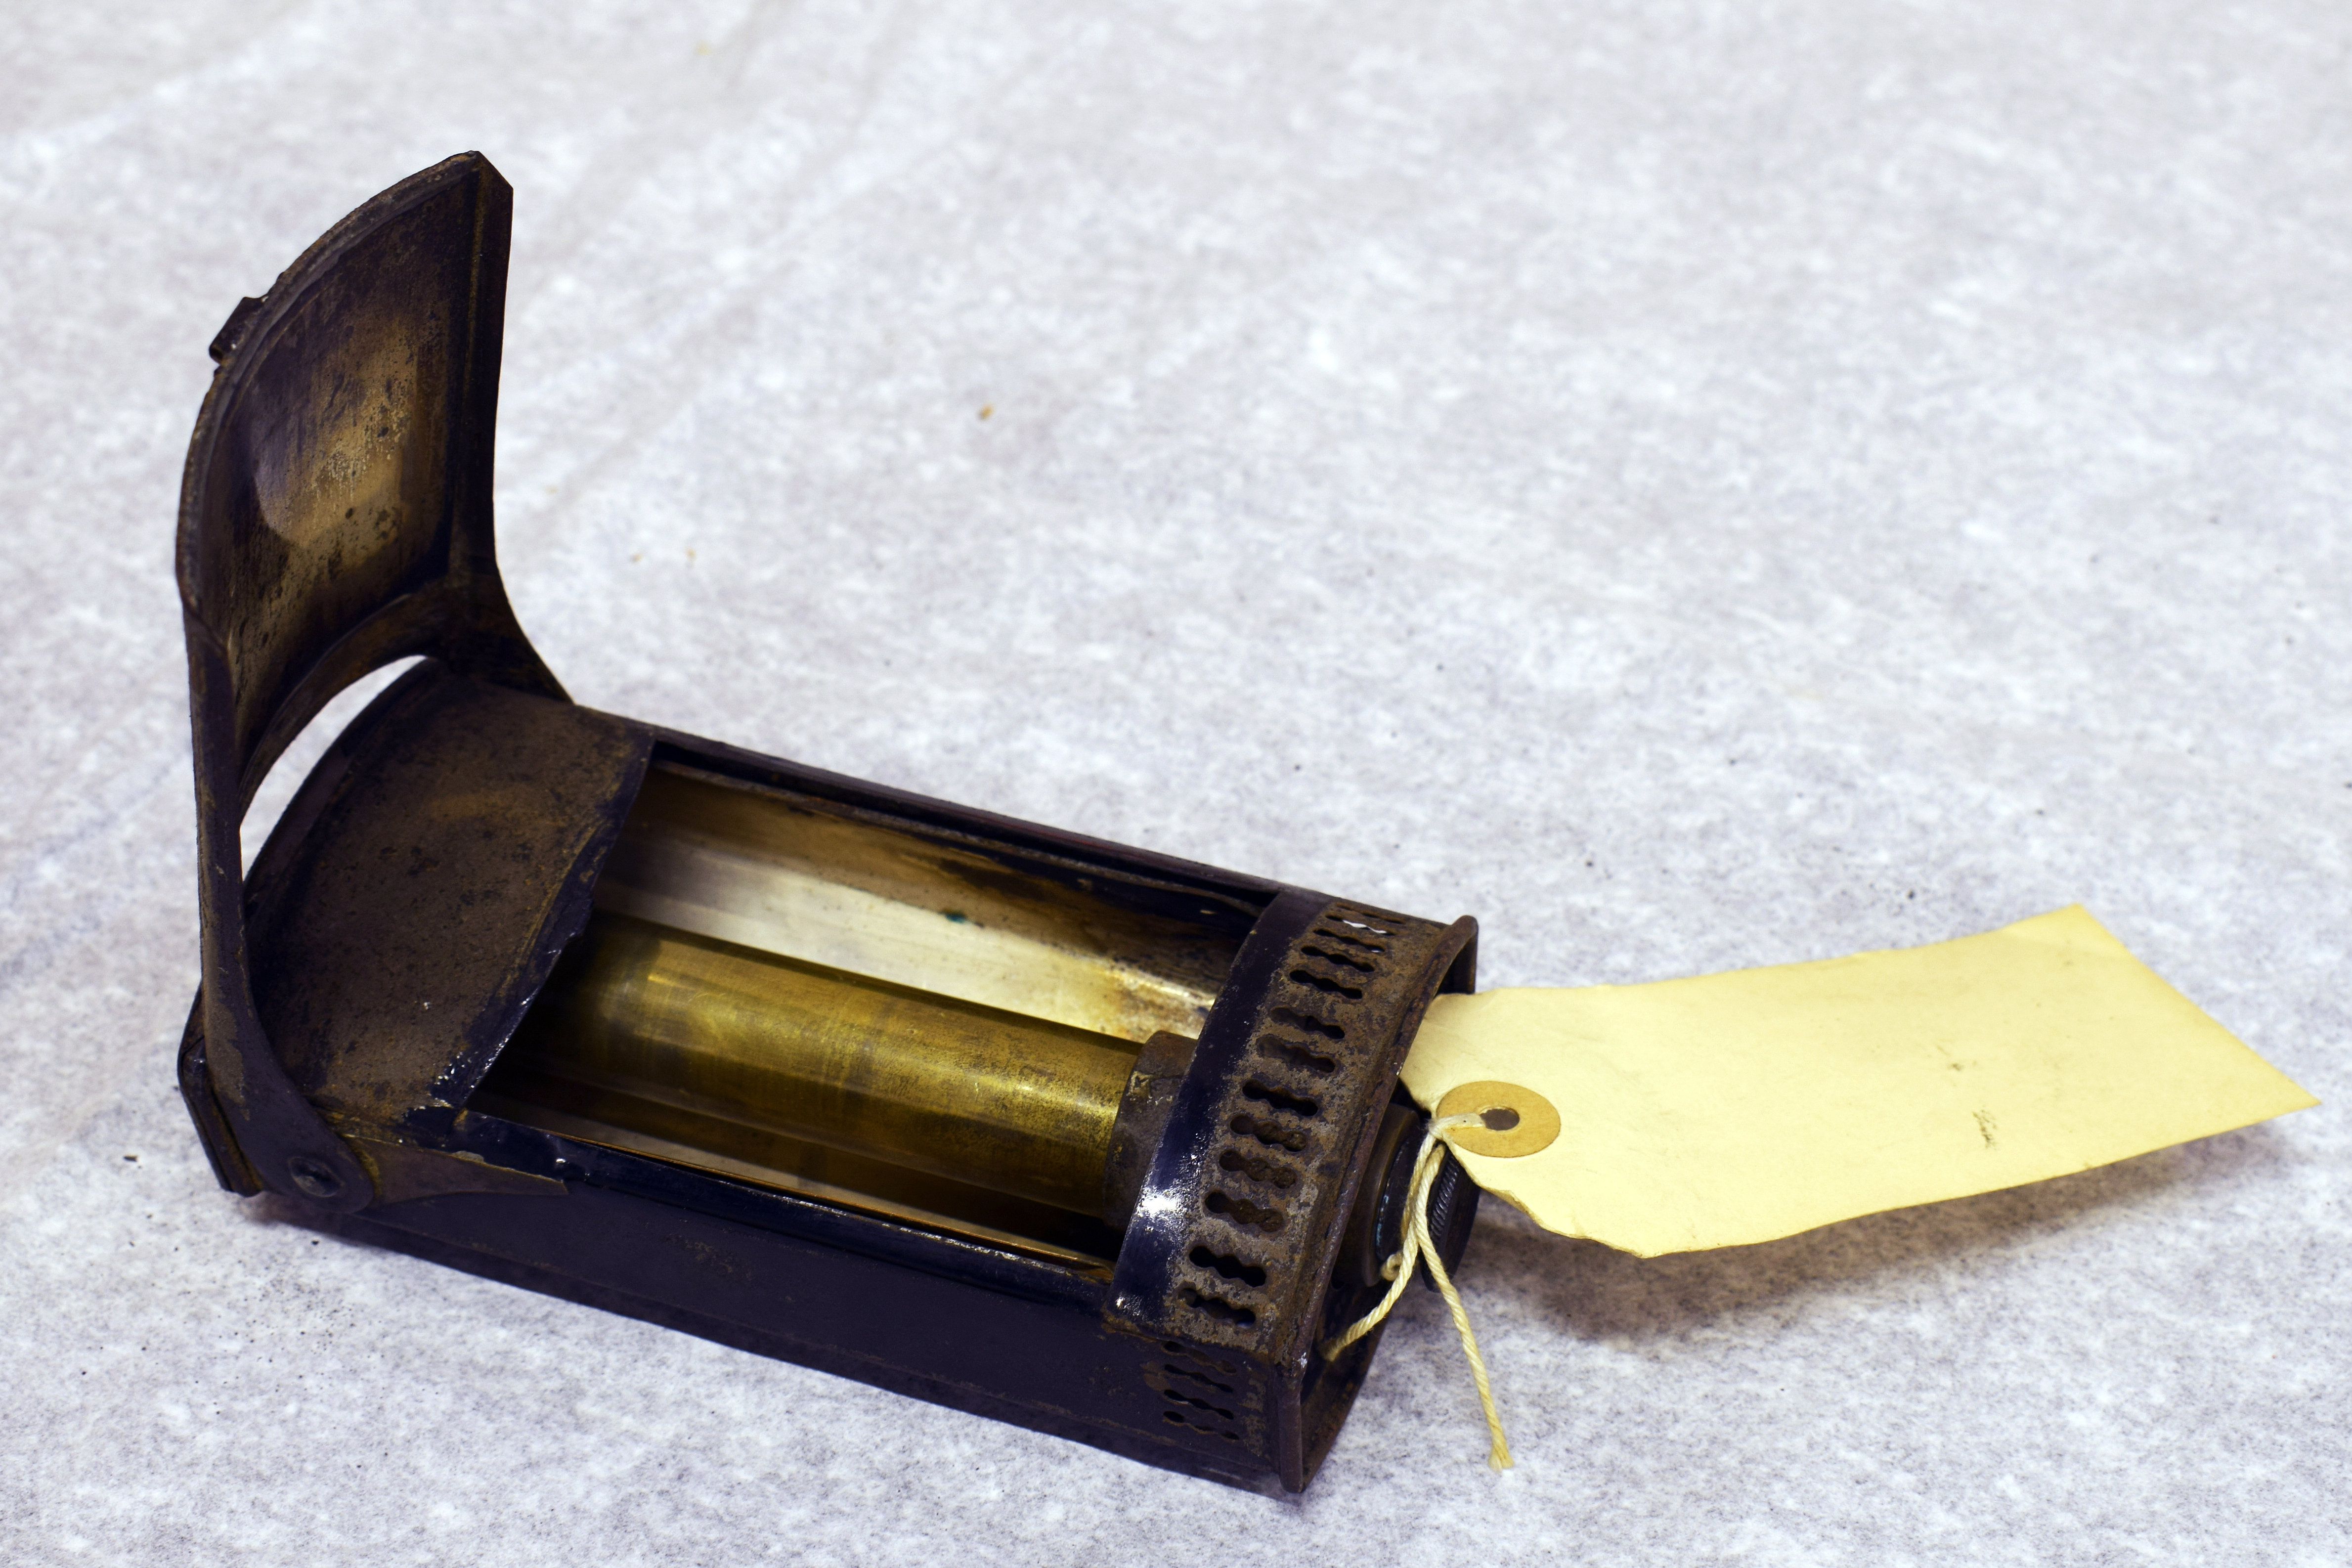
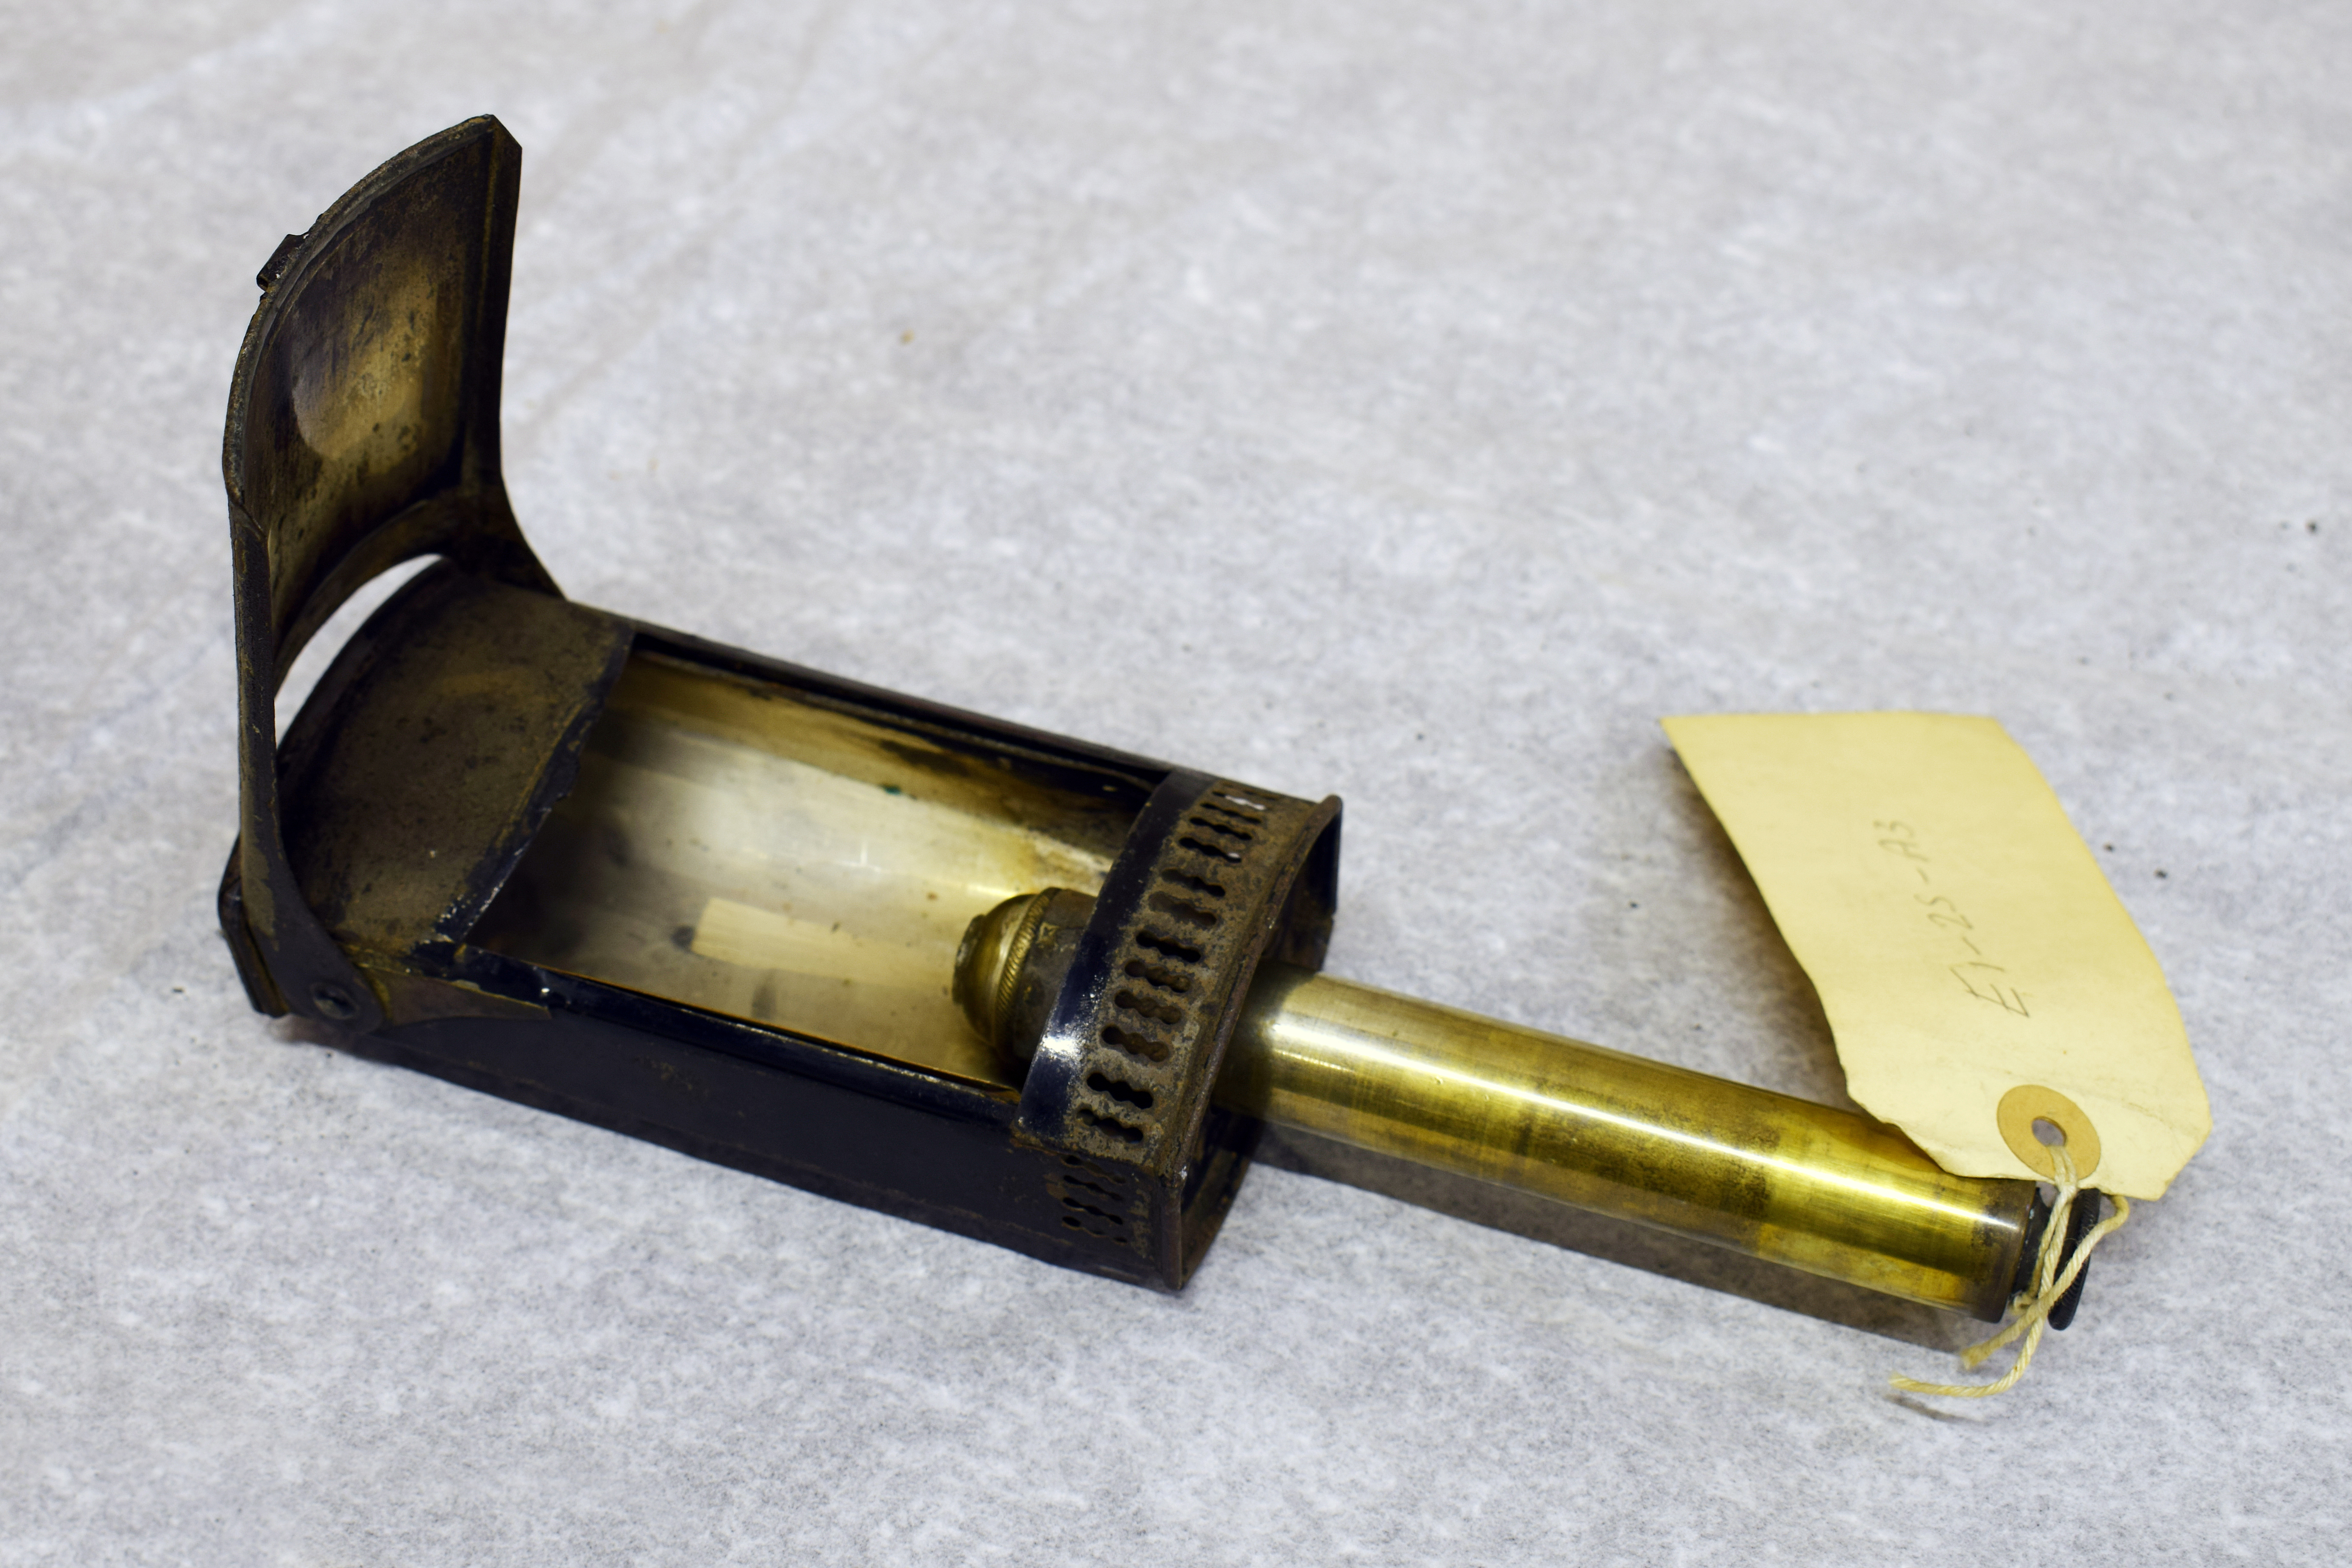
This is some sort of lamp. A flap on the front hinges up and the central bar that seems to hold a candle can be retracted up into the body of the lamp. We know what it does but we don’t know where it might have been used.
Object two
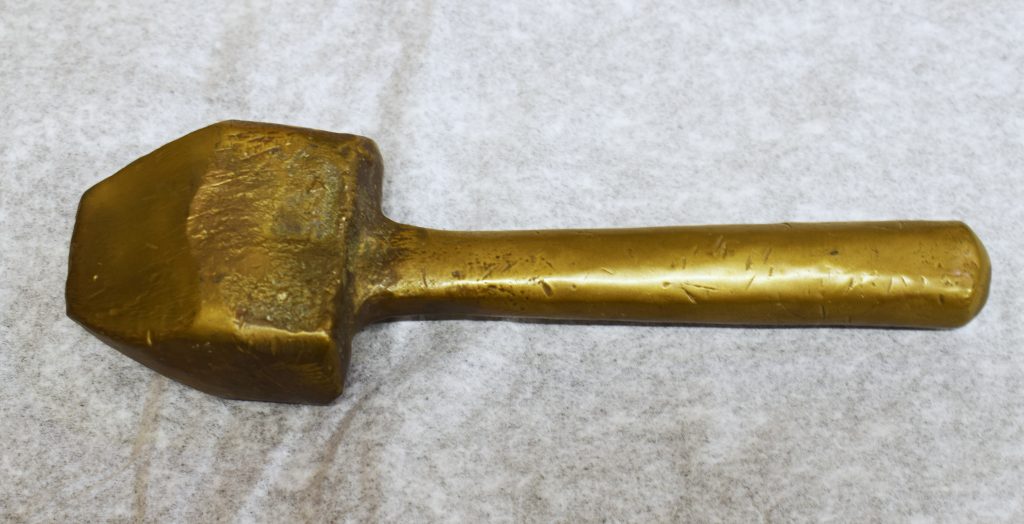
We don’t know what this is or what it was used for. It is cast in one piece from a copper-based alloy. It is quite crudely cast. The head is a rectangular prism where it joins the handle, tapering from all four sides to an edge. The end of the handle is rounded so does not appear to have been hit as it was used. The head used to have lots of parallel lines/scratches on the tapering edges but these have seemingly been worn smooth.
object three
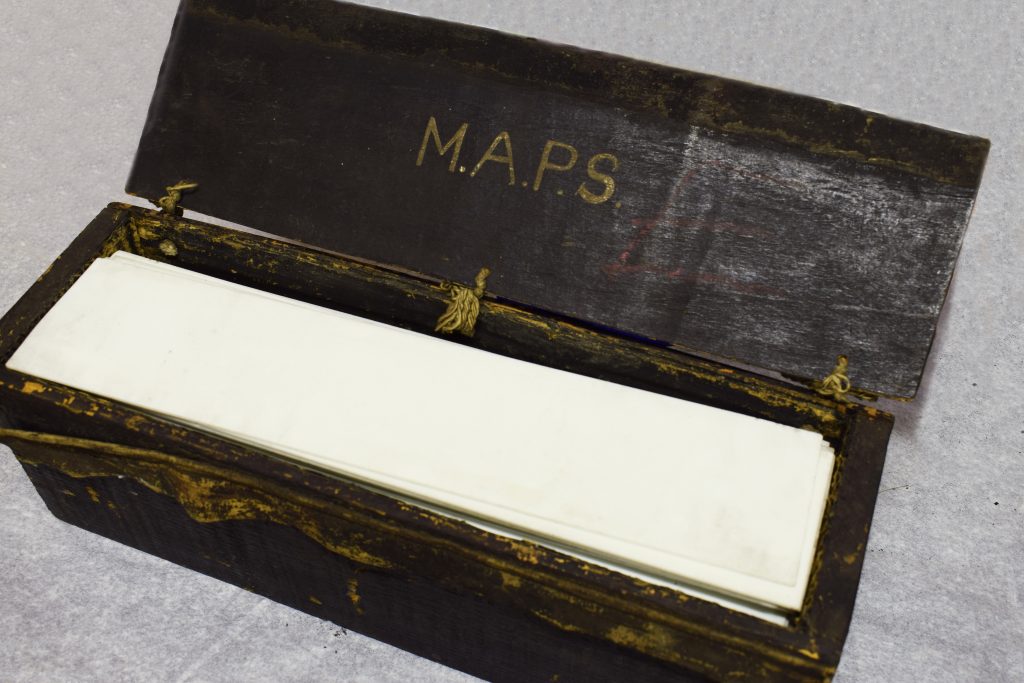
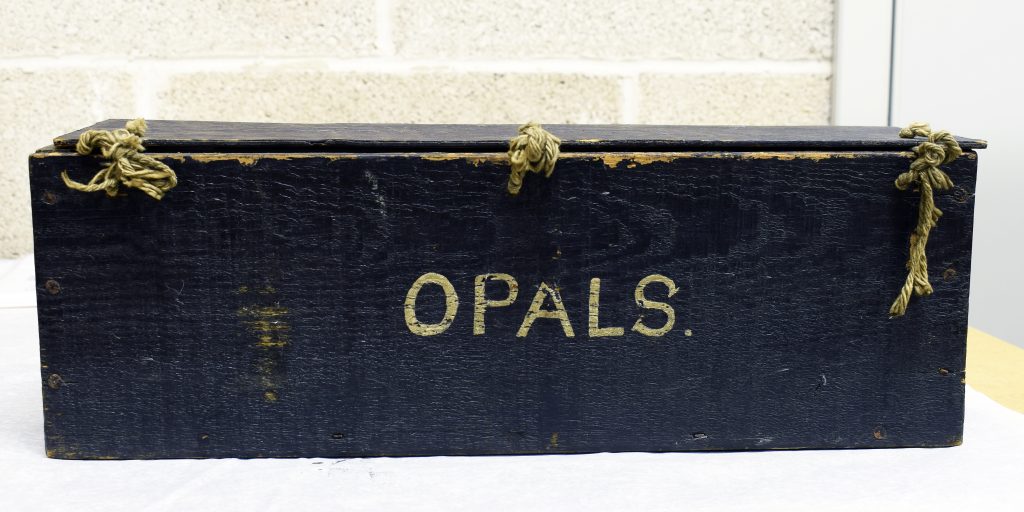
These are rectangular sheets of opal glass (semi-translucent white glass) in a rectangular wooden box. “M.A.P.S.” and “OPALS.” is painted on the box.
Object four
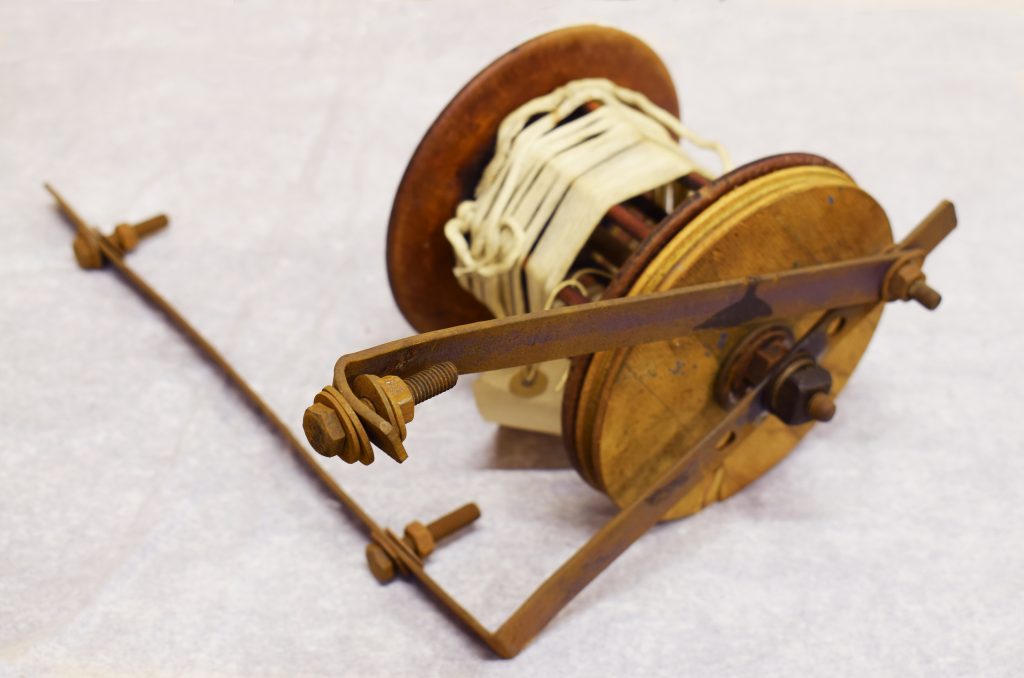
We’re not sure what this wooden bobbin with metal fixings was used for. We think it could be related to the textiles industry. Any ideas?
Object five
Any ideas what this scoop shaped tool would have been used for? It is open at both ends and has holes in three sides so it wouldn’t be much use for scooping.
Object six
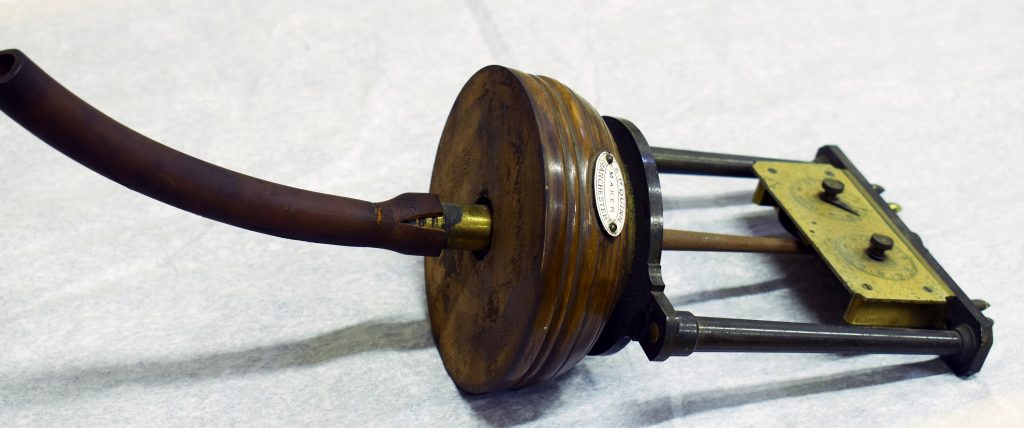
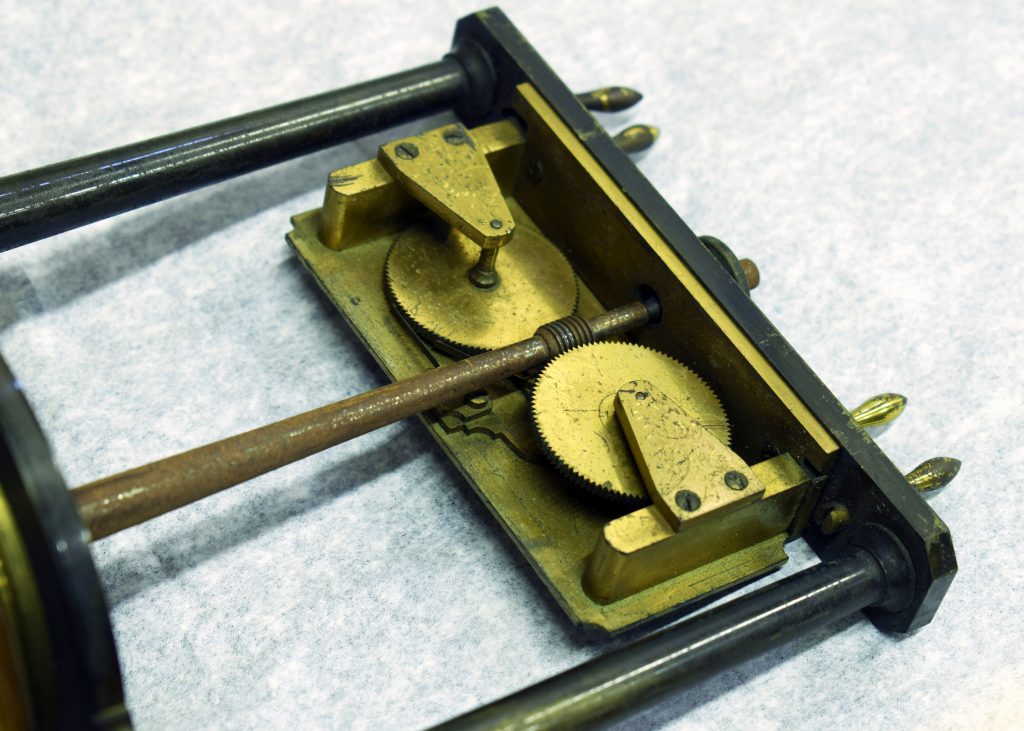
Science Museum Group © The Board of Trustees of the Science Museum
We don’t know what this object is or was used for. The central spindle rotates at the same time as the dials when the cogs are engaged. The circle of holes on the top of the base connects to the tube coming out the bottom.
There is a plaque attached to the base that say “E.P. Quinn Manchester Maker”. We have found a number of E Quinns in Manchester in roughly the right period. One sold microscope equipment and was a member of microscope societies, one was a schoolmaster teaching mechanics, one was a tailor and one was a bootmaker. The object may relate to one of these people.
Object seven
Do you know what this wooden mallet might have been used for? It has a distinctive pattern of wear: it has much more wear on the right hand edge of the two smallest sides.
Can you help shed any light on our mystery objects? Leave your comments below or email Abi by clicking here.
66 comments on “Help us identify some mystery objects”
Comments are closed.



Object 3 could have belonged to Manchester Amateur Photographic Society (aka M.A.P.S.). Opal glass filters are used for light diffusion in photography,
hink you might have hit on something there
https://en.wikipedia.org/wiki/Opalotype
I think we have object one. It’s a hand warmer. You light the candle and put it in your pocket, then put your hand in your pocket to keep it warm. I will try to find it and send you a picture of the box with instructions.
I second this thought. It looks like hand warmers that I have seen in antique stores.
Object 2. Being non-sparking brass, inclines me towards the explosive/ordnance industries; it looks bespoke or adapted, perhaps for sealing the rims of shell casings. No idea of the scale, alas. It looks quite small possibly.
Obj.5 I have seen something very similar, many years ago of course, being used on a (slowly rotating horizontal heated metal plate) Victorian era coffee-bean roasting machine. Used to sift and turn the beans by hand to ensure an even roast. The corrosion pattern might support this (quite acidic); and a wooden heat-insulating handle; and the slight offset of the handle ditto.
Obj. 7 looks to me as if it has spent time in a news print works in the days of moveable type. Dried on printers ink? Used for knocking up ‘formes’ (frames holding the composites together)? Anyone from the old Fleet Street chapels still out there? Intriguing!
Object four could be for plumbing / checking depth of shafts wells mines etc.
I have a nearly similar mallet to object number 7. This one could have been used in a confined space where the object being hammered is on the left of the narrow space.
Object number 5 reminds me of french fry scoops at fast food restaurants in the US. The server puts a paper or cardboard holder on the bottom and scoops the fries. It aligns the fries and fills the holder all at once. Perhaps this was a scoop for roasted chestnuts or something other from a food vendor. Put a bag on the bottom and scoop the contents into it. Maybe for nuts or grains or other things easier to scoop in bulk than by hand.
Object 5 is a seed spreader. You fill the container with seeds for large areas, turn the crank, spread the seeds as you walk.
Also can be used to navigate the stars on a cloudy day, Calcite was used during old times for that sole purpose, to use a sextant on a cloudy day hold up to the sky then use the Sextant. Ancient Mariners used this method while navigating on the ocean for cloudy days, seems to work great otherwise they wouldn’t be using it. Makes sense with the inside of the box saying, “Maps” and exterior saying opals.
Object five: Maybe a scoop-spreader thing for coffee beans drying in the sun?
A type of large rake is used to spread and turn coffee.
I would think more of a cement or other dense material tool. They use hoes with holes nowadays to mix cement and remove air bubbles from it. This could be a small-quantity tool for the same purpose. Cement has the density and consistency to not fall out right away.
Always find @sim-Manchester blogs interesting. If you are not in the trade, as I am not, this blog makes what at first glance seem a really boring job into something interesting.
Could object one be a warmer rather than a lamp?
Object 5 looks remarkably similar to the scoops used in McDonald’s to serve/portion fries. Object 6 looks to measure the either duration of a process or the length of a product being produced. A bit like an odometer on a car.
Object 6.
I think could be an oxygen flow meter. You adjust what flow amount you want on the top plate of the dials. A pump on the other end of the rubber tube sucks oxygen through the holes in the base. The pump then supplies the oxygen to test equipment or medical equipment. You then read off the dials what amount of oxygen you are using or require.
From what I can see of it I forgot to add the 4 spindles on the top are just for storing the hoses when the hoses are not in use. That is why they are double tampered so the hose is easier to slide on and off.
That does indeed seem part of gas flow meter device, possibly an antique spirometer or lab equipment for other gases.
http://phisick.com/item/little-gem-lung-tester-and-developer/
Object 6.
comment should read double tapered not tampered.
Object 2.
I think this could be a soldering iron heated up in a furnace and held in a gloved hand and used for making stained glass or lead work.
Object 5.
I think this one was used for making ropes.
https://www.youtube.com/watch?v=yT5uMJU1bpY
Object 7.
I think this one could have been used in a brewery or a pub to cork barrels or connect the taps to the barrels.
Regarding object #2, I first thought of a soldering iron because of the shape of the bevels on the face and because of the bulk of the head. If used for soldering, traces of solder should be apparent toward the tip, which I don’t see in the photo. Also, the handle would have to be wrapped somehow because it would get hot. The thermal mass might have been used also for “ironing” various materials. If the tool were heated, it might press leather, book bindings, power transmission belting, vulcanize rubber, cure various substances…
Has anyone admitted to blowing through object #6? While wearing the obligatory blue gloves, or course 😉
It looks like gas flows through the pipe and turns the central spindle. Then the meters record the volume.
Since the gas seems to vent out via the holes in the bottom, it’s not going to be for any precious gas, such as Oxygen, or coal gas. So I’d assume it measures volumes of air.
And depending how much gas it takes to get a reasonable reading off the dials (which look like they might be tens and units) it’s either for measuring lung capacity, or how much air is expelled by some scientific or engineering apparatus.
That’s some head scratching stuff, I guess the wooden mallet(Object no.7) was being used for carpentry work.
Object one could be an old time hand warmer.
I’m quite confident that object 2 is a tamper used in sand casting. It would have been used to ram down the sand around the model form. That it is made of copper alloy suggests it was probably made by one of the mould makers in the foundry. They are often made of wood and sometimes cast iron.
Wild guess: No. 2 could be a rammer used when sand casting metals. A mould is made by ramming green (damp) sand around a (usually) wooden patten. The mould is usually made in two halves which can be separated to allow the pattern to be removed. Additional channels etc, are moulded and cut into the mould so that molten metal can be poured in.
The one in the photo may have been made by one of the foundry workers for his own use using a crude pattern and using an alloy that was being used for production items. It would probably have been unnecessarily expensive otherwise.
Object two is a caulking iron, used to press stuffing into gaps to create a seal.
The object with a treadle could well be a foot operated hacksaw/’band saw’ with a very fine level of cutting and control needed. It has a rotating platter to cut in a circular fashion and a small grinding/sanding wheel at the side to remove burrs. This might also be a hand-wheel for fine control as on a sewing machine. I have seen one in a workshop many years ago dating from the 1900’s (possibly)
There is an almost identical machine Hobbies A1 ‘The Gem’ on E-bay currently for £45! May be a repro. of course.
Another possible use for Object 2 is as a welding ‘spoon’. This is a piece of non-ferrous metal on a handle placed behind a joint to be welded, when the metal is thin and liable to ‘blow-through’ as the steel panels are melted by the heat of the torch. The head has a variety of outlines and contours to accomodate various welds. It would dbe important to keep the face clean, as bits of weld that got attached would contaminate future welds, so it would have bene filed clean before each use.
Regarding object #2, when I worked in a steel fabrication shop, sometimes I would punch a hole in an I-beam in the wrong place. These holes were in the 3/4 to 1 1/2 inch diameter range, in steel up to 3/4 inch thick. I would take the beam to a welder who had a block of copper which he would clamp to the steel so it would block the hole. He then filled the hole with steel from his arc welder electrode. The copper fell right off when unclamped leaving a smooth repair. I suspect this might be an old idea which might be adaptable to oxy-acetylene or earlier welding techniques as well.
I saw the article in The Guardian on 20th July. The large gadget in the centre is a Treadle operated fret/scroll saw. Made by Hobbies A1. Circa 1900. My great grandfather made a lot of really intricate dolls house furniture (for my late mother,)
which I still have.
There are some of these saws on e bay at the moment and some demos on YouTube.
I expect that you probably know all this by now, after the feature in The Guardian.
#5 corn sheller or a tool used to help can corn.
#7 looks like a printers mallet used to set type.
Object one looks like a trench lamp .. the only reference I could find was on a Pinterest page which had it labelled as a VICTORIAN BOER WAR HAND HELP TRENCH LAMP https://www.pinterest.com.au/pin/691513717756316016/ so not an entirely stable reference.
Wild guess – Object seven used in shoe repairs. That would explain the uneven wear – because we tend to wear away one side of our heels more than the other. And leather would not have damaged the wood, as opposed to carpentry work on metal or wood.
I would tentatively lean toward a rammer for producing sand moulds for Object 2. The shape of the head seems a little more pointed than usual, but it could be for special purposes, such as forcing the sand into details on the pattern.
I know foundry tools were often cast in the same foundry where they were used, often in copper-based allows like brass, bronze, or gunmetal. That would also fit with a crude casting. If it wasn’t intended to be sold but was just a moulders’ tool being cast with the leftovers from a pour, it would only have to be good enough to be usable. The striations that have largely worn away may have been rasp marks from shaping the head in the wooden pattern or coarse filing marks from roughly finishing the casting. If they are file marks, they may also be related to reshaping the head for some special purpose.
OBJECT SEVEN
looks to be for tapping (unless the handle is part broken off) as unlike a ‘traditional’ mallet, with a short handle one would not strike the target repeatedly. I think not a type setter’s mallet, as of late it has not been hitting a flat surface, so it could have hammered the tap into the barrel ‘keystone’. Though the cellar man had a bad aim if that is how the face wore. That is more as if it was hitting an edge adjacent to a surface.
But after ‘retirement’ it could have had other uses.
Andrew
It looks like a woodworking mallet.
In the past I did some woodworking and learned it from a profesional woodworker Christopher steffens.
He had 3 different wooden Mallets he had them for different types of job’s.
The commen round one in 2 different weights and this type he just it for places where the round Mallett did not fit.
Greetings,
Jeroen keyner
Ps. Englisch isn’t my native languages
OBJECT FIVE
from the angle the handle fixes, looks as if it was slid towards the smaller opening end, if it was slid along / over something. Does it have any internal signs of ware / ‘shining’?
Also, it looks similar to a blowlamp nozzle – does it have any signs of excessive heat?
The object – jokingly akin to tiny ice-cream scoop – shown during the latest edition of the BBC’s Inside Science prog is obviously a medical implement, and needed to capture a large and troublesome hemorrhoid – perhaps not quite descended [externally] so that it may either be pulled to then be cut off, or just moved aside. Ouch.
Hello,
From the given views Object No. 6 is, I believe with reasonable certainty, a 19th C laboratory siren designed for comparing the pitch of a sound and displaying its frequency in cycles per second, by counting the number of turns of the central shaft in one minute by reference to a watch and the dials at the top.
The shaft is free to spin in as friction free bearings as could be devised at the time and at the lower end it carries a circular brass disk perforated with one or more concentric circles of equally spaced holes and if more than one, each circle is of a differing count typically eight, ten, twelve, and sixteen holes.
Obviously we cannot see this without a top view so we assume one ring of holes.
Mounted immediately below this is a circular brass disk, this is fixed onto the top of the hollow wooden body and it also has a ring of holes that match in size and alignment with those in the rotating disk.
Air under pressure is admitted into the brass tube at the bottom and if the holes in are in both disks are in line the air will pass out freely to the atmosphere, if however the holes do not align it will not. When the top disk is rotated the air will come out in little puffs and if rotated faster the puffs become a humming tone, which will rise in pitch until it becomes a musical note or pitch, which if it were possible to rotate the disk fast enough would rise in pitch to exceed the limit of human hearing, although it may discomfort dogs and bats.
But how is the disk kept in a steady rotation for the purposes of measuring the pitch of say an organ pipe or a wasp’s buzz? The answer is that the holes in the lower disk are drilled at an angle that directs the air to one side and the holes on the rotating disk are drilled the opposite way so that the oblique air jet from below impinges on the side of the hole and has to push the disk to one side to escape through the top and this forms a simple air turbine similar to a micro windmill that pushes the wheel around as long as air is supplied. By regulating the pressure of the air the speed of the wheel and therefore the pitch of tone can be adjusted to match that of the organ pipe and by counting the revolutions of the wheel in one minute and knowing the number of holes in the circle the actual frequency in cycles per second ( now expressed as Hertz) can be calculated.
Oh dear sorry I have gone on a bit.
As a postscript to my overly long description: The pins on the top of the case are levers which when pushed aside instantly click the gearwheels out of mesh with the worm and stop the hands so that the recorded revolutions after say, one minute can be can be read. The instrument was based on a development of an early experiment by Hooke in 1678 and later developed by Savart who added the tachometer and later refinements by others.
Unfortunately I cannot see these as I cannot download the gallery pictures though.
As a postscript to my already overly long description of object 6: The brass pins on the top of the case are levers which when pushed aside instantly click the gearwheels out of mesh with the worm and stop the hands so that the recorded revolutions after say, one minute can be can be read. The instrument was based on a development of an early experiment by Hooke in 1678 and later developed by Savart who added the tachometer and later refinements by others.
Unfortunately I cannot see these as I cannot download the gallery pictures though.
Object 6 is a metering device. What appear to be two gear wheels are a worm wheel and a ratchet wheel. The worm wheel (attached to the LH dial when viewed from the front) appears to have a ratio of 1:100, so one turn of the dial indicates 100 of the main spindle. The ratchet wheel (RH dial) counts turns of the worm wheel, and having a similar pitch, one turn indicates 10,000 turns of the spindle. The hose could be a flexible drive. Need a better view of the brass pins on the top of the device. Application area? No idea.
Object No. 4
Warping Drum?
Appears to be made to be fitted onto a bench, the bearing arrangement for the drum is crude and not intended to revolve a great speed, but it has a pulley so we could assume that it is designed to be treadle or motor driven in order to wind a long length of thread or several separate threads at the same time onto the drum, however it is not very wide.
My thought is that it might be an artisan weaver made warping drum, but as it is small, perhaps for a narrow cloth such as webbing. Once the warp is wound off separate bobbins to length it is then unwound in a orderly way onto the loom beam ready for threading though the heddles.
Number 2 is a caulking pusher for caulking decks in ships. Number 7 is a is used for putting wooden taps in wooden beer barrels
My immediate thought when reading through the article was that it looked like a warping mill. With no measurements given, the mounting arrangement is my only guide to size and made me think it was too small for that purpose. However, your suggestion of it being for webbing makes perfect sense. My father had a larger version for weaving cushion fabric and an even larger floor standing version with vertical axis for upholstery fabric. As a young child my arms offered a temporary support as the warp made its way from mill to loom.
Object 4 could be a handmade log to measure the number of knots when the rope is unwinded behind the boat….
Item number 2 looks like a rammer used whilst making sand moulds. The sand needs to be compacted very tightly, so this is used to compress the sand into the box.
I used one almost identical, but made of aluminium, when I was making sand moulds for brass casting.
The object two is made of a non sparking alloy. I would suggest you contact The Royal Amouries or The Artillery Musuem at Woolwich. It looks like the sort of tool used to remove stuck charges from artillery.
OBJECT 2 reminds me of a sailmaker’s seam rubber, used for creasing down seams in the edges of sailcloth. These are often in dense woods like box or lignum vitae or made from ivory.
I can also see how it could be a sand casting tamper. I am less convinced by the idea of a caulking tool , since you would generally have a striking surface to hit to drive the caulk in.
I wonder if the wear patterns would give any further clues under magnification? I would guess running against canvas would produce more polishing and less pitting than pushing sand into a mould.
I saw the article in The Guardian on the 20th July. The oversize gadget in the centre featured a treadle-operated fretsaw. Made by the firm – Hobbies Ltd, Dereham who had outlets in London, Glasgow, Manchester, Birmingham and Leeds. Often used in model making. Advert claimed it ‘Why should you make a toil of pleasure when Hobbies ‘A1′ Treadle Fretsaw will drive the tedium of fretwork away?’ The No.2 I think cost 28/-. Could be found and used by model makers during the 1st quarter of the 20th century and beyond.
Object 5
Maybe a holster type of thing for a tool, too hot to put down, so held by assistant while user of tool works with both hands or other tools.
Glass making?
Object Two. A seam rubber for folding canvas edges I trained as a sailmaker and worked with Grain ship sailmakers in 1969 New York sail loft using a similar tools. I have a wood version of the same. Hand tools such as thread winches and seam rubbers where made for the job in hand before this time.
Object Five. Appears to be a flame deflector for a paraffin blow lamp for protecting glass when softening putty or lead in window refurbishment process, the flat edge sits against the glass.
Object 2 has a head shaped almost exactly like an aged version I’ve seen knocking around in our bronze foundry. Used for ramming the sand in a mould. The earlier suggestions that it was “home-made” by a moulder has merit, in my opinion.
Item No. 2 looks to me to be a tool for applying Scotch or boiled glue to wood working joints. It would sit in the nearly boiling pot, to be taken up every so often, and the serrations would have enabled just enough glue to be spread over the wood. Made of brass, it has over the years, in a busy factory become smoothed down. It has distinct wear, that would have soon become lost – rounded – if it were a moulders compacting tool. I was brought up in this industry, using a brush for the same job. Each brush lasted a couple of days, and off cuts of wood were found to be better spreaders. Wish we had invested in something like this.
Fascinating article. For some objects it would be of great help to have an indication of size. Either photograph with a scale in shot (like the archaeologists) or include an overall dimention in the text.
Object 2: Yes, this could well be a sailmaker’s seam rubber as it has the look and shape of one. They are mostly made out of wood by their owners. Indeed I use one that has been passed down the family. They would be used on cotton and flax sail cloth for rubbing down the tablings or smoothing hand stitching. The wear mark in the middle of the head is consistent with rubbing down hand stitching to make it smooth. It may have been adapted from a previous purpose, which would explain why, over time, the cloth being rubbed, would smooth out the scratches.
The choice of metal is correct as it would not be too hard and damage the cloth. An old sailmaker I used to work with had several metal seam rubbers. One was an old caulking iron that was adapted for the work. It is held rather like one holds a fork and pushed ahead on the creased cloth to be folded. Without such a device, heavy cloth could not be creased very easily. I only use mine on natural fibre material as modern cloth bends and creases quite well underneath scissors.
If it was made as a seam rubber then it is pretty much the right shape and is very close to a wooden seam rubber. I should think this works better than a wooden seam rubber and when sailmakers made their own tools, which in these specialised types could not always have been bought, then it may look a little crude in its construction. Having from time to time made some of my own specialised tools and knowing others who have done the same, they can look a little homemade but they do the job.
Object Two
Carpet-fitter’s carpet stretcher? Though one might expect it to have a knee pad.
Object Two
Could be a lead roofer’s bossing tool? Eg for driving lead sheet into angles, rolls, etc… Nowadays usually made of plastic.
#2 reminds me of a chinking tool I’ve seen used to pack chinking between the logs on log cabins. Doubt that is it but could have been used for something similar.
Object 6 could be a manometer. A very early type that used a gauge we use these in HVAC or gas pressure either for vaccum or pressure in water columns etc. There could be a diaphragm in the wood base, and the piece at middle at the very top would be the Zero adjustment
Object #2 is a home made soldering iron used by tin smiths. Both for sheet metal work and other work, anything from making cookie trays to stove pipes.
I have seen them used in the past in person.
Different metals hold different heat, and brass is a “soft blow” metal, so you can do “dead blows” where you need them.
Object Five:
I’m a gardener and this object looks like a tool I use to dig, loosen the dirt, and plant bulbs. A tool like this is used to create and maintain a hole deep enough to place a bulb, which often needs to be planted 6-8” deep, depending on the variety. You can try to hold the dirt back with your hands, but a tool like this makes it easier to measure the depth of the hole and eye the precise placement of the bulb. If we knew the size measurements, it would help to rule out my theory. I use the scoop side of my tool to dig and loosen the soil and then I place the funnel part into the small hole and place the bulb. Then, I use the other side, again, to fill the hole and smooth out the dirt.
The object 6 is possibly a taffrail log.
A propeller is attached to the braided line and dropped in the water behind a boat. The dials spin at a certain rate and with a watch or minute glass indicate the ships’ speed.
Regarding object 6 the E.P, Quinn mentioned in conjunction with microscopes was my Great Great Grandad. I believe he was a teacher as well so 2 of them could be the same person.
A microscope with his name on in now in Oldham museum
Object 6.
Just to add a further comment regarding Object 6.
I was the person who donated the E P Quinn microscope to Oldham Museum mentioned by John Quinn in the previous comment and with whom I have been in contact previously.
My reason for donating the microscope that had been in my family for all my years and which I used as a child was to say the least, unusual. On a visit to Oldham Gallery/Museum with our grandchildren during the recent Easter holiday, we noticed a painting of a man in a scientific looking environment with a microscope that closely resembled the one in question. Since none of our children nor grandchildren wanted the microscope, it seemed to me that it would be better to donate it, if they were willing to accept it, for future generations. After an initial contact, it became clear that the museum which holds a significant collection of microscopes and slides, did not have one of this type i.e. an E P Quinn one with a Manchester stamp, so were eager to add it to their collection. They could find no information about the maker in their researches.
This piqued my curiosity so I found a little time to do some delving. As John Quinn rightly points out, he was a teacher, a science teacher in fact, born in Ashton under Lyne in 1850. He was a member of the Manchester Mechanics Institute and very active in giving talks on microscopy and what might be termed nature study. Interestingly, his son Harold was a scientific instrument maker in the 1901 Census although by 1911 he’d had changed profession.
I would concur with John Quinn that the object is something to do with microscopes somehow: Edward Paul Quinn in a talk entitled “ The Microscope In Its Relation To The Study Of Botany “ delivered at the Albion School in Ashton under Lyne to the Albion Literary Society
in 1879 employed an oxy-hydrogen microscope. Obviously E P Quinn was employing cutting edge technology so, and this is pure speculation of course, I would suggest that Object 6 is part of Quinn’s microscope related equipment. This still does not conclusively prove that assertion but it is highly plausible I think.
My real question still remains though- how did he come to manufacture microscopes? Perhaps he really did or maybe he just subcontracted their making to another, his son?
Whatever the truth, I have no doubt that through my genealogical research that this E P Quinn is the one born in Ashton under Lyne as the microscope was owned by Daniel Rose who died in 1950 at the age of eighty four. Although not my blood relative, he was related to my aunt’s husband who inherited the microscope plus many slides from the 1870’s and 80’s, now also in the curatorship of Oldham Gallery/Museum. Besides these there came a wealth of books on botany plus tomes on mathematics, design, chess, and the classic Harmsworth self-improvement tomes, sadly now disposed of years ago! Daniel Rose was a painter and decorator but like many a Lancashire man of the time, was an avid student having taken a science paper at the then Owen’s College. Because of their contemporaneous lives, it is highly likely that E P Q and Daniel Rose knew each other or, at least, he Daniel Rose, knew the Ashton Quinn family.
John Quinn also provided some extra information about some skulduggery regarding EPQ’s possible plagiarism of slide labels….
Anyway, in conclusion, I hope this helps. I would be more than willing to provide my research results on the life of Edward Paul Quinn if that helps.
Kind regards,
John Holland.